|
|

|
|
All use of my digital work is covered by this
Creative Commons Deed.
Please do not use any of my work for commercial purposes, thank you. |
|
|
|
|
2 Point Clipping (1 of 4)
|

|
|

|
|
|
|
|
 |
|
|
|
The first type of brush you will probably create is a square/rectangle
shape. There is only so many things you can do with a square brush
before you will want to cut it up into more interesting shapes. This
article will show you how to cut square/rectangular brushes to form
more varied architecture.
In order to create different shapes you will need to use the clipper
tool. This feature is basically a virtual knife which, with the aid of
markers (blue dots) specify an angle to slice the brushwork.
The clipper tool can be broken down into two modes of operation. The first
version (covered in this article) is using two markers (blue dots) to
cut brushwork in one direction (axis). The second version uses three markers
(blue dots) and is covered in another article.
It is highly recommended to start with the basic clipper tool operation
(two marker version) because the second mode will build on previous
experience and understanding of the tool.
|
|
|
|
|
|
 |
|
|
|
|
|
|
|
|
|
|
 |
|
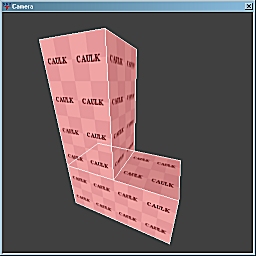
For this article you will need to create some brushwork
to test out the clipper tool. First create a couple of
basic rectangular blocks (like the diagram to the side)
in the shape of a L.
Why create two brushes?
This article uses two brushes later on to show that the clipper tool
can affect more than one brush at once. Not every operation
with the clipper tool will be dedicated to a single brush.
|
|
|
|
|
|
|
|
|
|
|
|
|
|
|
|
 |
|
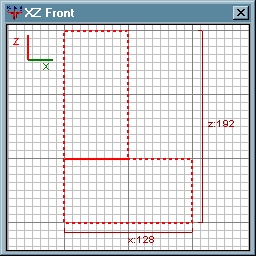
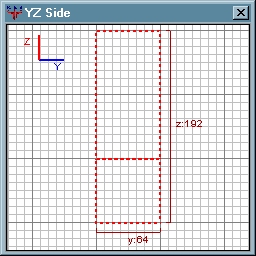
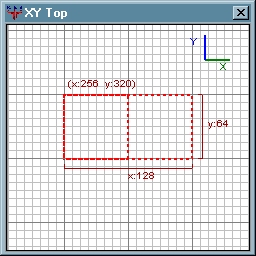
To create a brush in the editor, look at the 2D window first.
(It should be the one with all the square grid lines)
Make sure the 2D window is setup using the XZ Front view. The active
view will be displayed in the top bar of the 2D window.
This article is assuming your editor is configured with one
big 2D window, not three smaller one's. There is
no real advantage to having three small windows, when you can
have one big window instead! Look at the preferences of the
editor if you want to change the 2D window layout.
If you need to swap around the views of the 2D window
use the "CTRL+TAB" keys. With this key combination
the 2D window can display a front, side or top view of brushwork.
Take your time to learn this key combination because it will allow
you to quickly look at brushwork from different directions.
|
|
|
|
|
|
|
|
|
|
|
|
|
|
|
|
 |
|
When using the "CTRL+TAB" key combination all currently
selected brushwork will be centered in the 2D window. This can be
very useful if you are wanting to focus on one part of the map
at any one time.
To create a brush, move your cursor to the top left corner of
where you want to start. Press and hold the Left Mouse
Button (LMB) and then gently drag the mouse cursor down towards
the bottom right corner of where you want the brush to end.
As the mouse cursor moves downwards the editor will draw a
red dotted line around the new shape. Once you release the
LMB the brush will be created.
If the size of the brush is not similiar to the three diagrams
to the side of this section then change the brush to fit. Each
diagram shows a different viewpoint of the brushwork with measurements
enabled. (Press "Q" to toggle this feature on/off)
|
|
|
|
|
|
|
|
|
|
|
|
|
|
|
|
 |
|
To change the size of a brush it will need to be selected first.
If the brush has a red dotted line around the outside then its selected.
Otherwise point the mouse cursor at the brush, press and
hold the "SHIFT" key followed by a single click of the LMB.
Move the mouse cursor to the outside edges of the brush.
(The cursor should not be on the inside of the dotted lines)
Press and hold the LMB and gently drag the mouse either away
from or towards the center of the brush.
When you are finished with re-sizing of the brush just release
the LMB. The editor can re-size the brush in multiple directions
if a corner is used. Otherwise repeat the above steps if you need
to change the size of the brush from a different edge.(axis)
Cycle round the 2D window ("CTRL+TAB") and check the brush is the
same size as the side diagrams. Once you are happy with the
first brush, then create the second one as describe above.
|
|
|
|
|
|
|
|
|
|