|
|

|
|
All use of my digital work is covered by this
Creative Commons Deed.
Please do not use any of my work for commercial purposes, thank you. |
|
|
|
|
Terrain Blending (1 of 6)
|

|
|

|
|
|
|
|
 |
|
|
|
 |
|
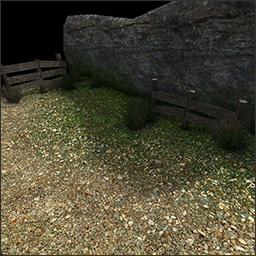
On the left is a beach scene showing what this terrain blending
article plans to achieve over the next couple of pages. The methods used are
primarily designed to work with the Quake 3 engine and the latest version of the
q3map2 compiler.
This article assumes that you know how to use the current Quake 3
editor to create maps
and understand how to write or change Quake 3 material
shader files.
If you want to follow this article with working example maps, shader files and
the correct textures available in the editor, then I highly recommend you download the
source files.
|
|
Click on the above image for a larger version |
|
|
|
|
 |
|
|
|
|
|
|
|
|
|
|
 |
|
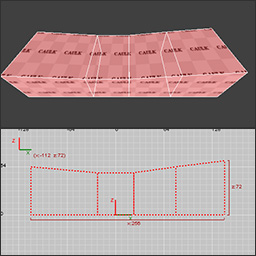
Lets begin in the editor by creating four brushes in a row like the diagram
to the left shows. The brushes don't need to be identical in size but
they do have to be next each other with no spaces in between.
Switch the camera around to the side view, and raise or lower the shared
edges between the brushes to produce a downward curve, or dip, in the side
profile, as in the diagram on the left.
A quick way to move the brush edges around in the editor is to use the
edge tool (shortcut E) which is also very good at reducing any chance
of brushwork errors.
|
|
|
|
|
|
|
|
|
|
|
|
|
|
|
|
 |
|
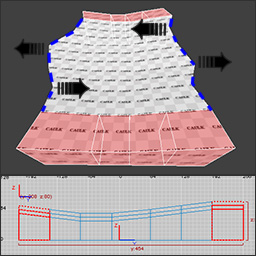
Take the existing four brushes and duplicate them so that
there are seven rows next to each other. Shift the brushwork rows left and right,
like the diagram to the side shows.
To shift a brush around, first select it and then in the 2D view window
place the mouse cursor next to the brush side you want to move. Then press
the left mouse button + CTRL and slowly move the mouse cursor.
Finally switch the editor camera to the side view and make sure the brushwork
rows gradually moved up and down like the image to the left shows.
If you get stuck creating the brushwork then I recommend you download the sources
files.
|
|
|
|
|
|
|
|
|
|
|
|
|
|
|
|
Once the terrain brushwork is complete the next step is to create a new Quake 3 material
shader
file. (Do NOT use the line numbers below in your shaders; they are for reference only.)
01
02
03
04
05
06
07
08
09
10
11
12
13
14
|
textures/terblend_soc/tut1_sand1
{
qer_editorimage textures/terblend_soc/ivec_sand1.tga
q3map_tcGen ivector ( 128 0 0 ) ( 0 128 0 )
{
map textures/terblend_soc/ter_sand1.tga
rgbGen identity
}
{
map $lightmap
blendFunc GL_DST_COLOR GL_ZERO
rgbGen identity
}
}
|
15
16
17
18
19
20
21
22
23
24
25
26
27
28
|
textures/terblend_soc/tut1_moss2
{
qer_editorimage textures/terblend_soc/ivec_moss2.tga
q3map_tcGen ivector ( 128 0 0 ) ( 0 128 0 )
{
map textures/terblend_soc/ter_moss2.tga
rgbGen identity
}
{
map $lightmap
blendFunc GL_DST_COLOR GL_ZERO
rgbGen identity
}
}
|
The two shaders above are using a standard two stage (texture + lightmap) Q3 shader format and
are setup with a similar structure except for the filename differences.
Lines 4 & 18 : This is a compiler command to set the texture alignment and ignore any editor
settings. It is not necessary for the terrain textures to be aligned to the world geometry and
this option also reduces the chance of alignment issues across terrain blends.
The terrain textures are 512 x 512 in size and should use a setting of 256 instead of 128 for the
'q3map_tcGen ivector' command. The lower value makes the textures appear to be double density
(0.25 scale in the editor) so they look better for screenshots.
|
|
|
|
|
|
|
|
|
|
|
|
|
|
|
 |
|
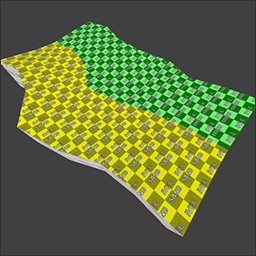
With the brushwork and material shaders setup next paint the terrain
with the editor textures and compile the map. Remember to place the sand on the left
and the grass on the right.
Often the hardest terrain textures to blend are high contrasting colours because the
blend edges are more obvious to any problems. This is the reason why this article is using
sand and grass because it is easier to see what is right or wrong.
If you want to follow this article with working example maps, shader files and
the correct textures available in the editor, then I highly recommend you download the
source files.
|
|
|
|
|
|
|
|
|
|


)
