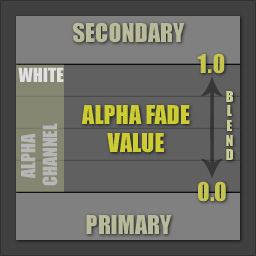
News Design Artwork Photos Articles
Creative Commons All use of my digital work is covered by this Creative Commons Deed.
Please do not use any of my work for commercial purposes, thank you.
 Terrain Blending (2 of 6) Previous Page Next Page
Bleak Landscape This is what the terrain looks like without any kind of blending between the two materials. The seam down the middle is harsh and the two textures have contrasting colours which makes the divide even more obvious.

The next step is to change these two materials so that they blend together in the middle using the alpha fade system.

This is a q3map2 compiler feature that uses special Q3 material shaders and additional brushwork. Unfortunately the blending cannot be visualized in the editor, but with some inventive brushwork can be hinted at instead.

Click on the above image for a larger version
 Alpha Fade Blending    
Alpha Fade Blending The alpha fade value affects the transparency of the secondary layer by adjusting the overall value of the alpha channel while the primary layer is drawn underneath.

If the secondary layer does not have a custom alpha channel, the Q3 engine will create a solid white one by default.

This is a linear type of blend because the alpha fade value is constant across the whole of the secondary alpha channel. The system really works well with 'soft' edge materials types like dirt or sand.

The alpha fade values are setup with special Q3 material shaders that tell the engine what to do with the secondary layer alpha channel. For this article only two values are used (0.0 and 1.0) but other values can be created as well.

01
02
03
04
05
06
07
08
09
10
textures/terblend_soc/alpha_000 { qer_editorimage textures/terblend_soc/alpha_000.tga q3map_alphaMod volume q3map_alphaMod set 0.0 surfaceparm nodraw surfaceparm nonsolid surfaceparm trans qer_trans 0.7 }

11
12
13
14
15
16
17
18
19
20
textures/terblend_soc/alpha_100 { qer_editorimage textures/terblend_soc/alpha_100.tga q3map_alphaMod volume q3map_alphaMod set 1.0 surfaceparm nodraw surfaceparm nonsolid surfaceparm trans qer_trans 0.7 }

Lines 5 & 15 are the alpha fade values with a range of 0.0 to 1.0.

These shaders work in the same manner as a volume of water when applied to brushes. All vertex points (for example the corners of a brush) that are inside the volume of water will be affected by the shader and have their alpha channel values changed.

 Poles Apart    
Poles Apart The alpha fade system cannot be visualized in the editor, but with a row of poles in the ground winding its way along the blend edge it is easy to see what is happening.

In the editor create a thin rectangular brush which is higher than the tallest point of the terrain and extends down to the bottom. Place the new brush over the top of a corner point on the outer edge of the terrain.

Copy the pole all the way along the outer edge of the terrain like the diagram to the side shows. Create additional sets for the middle and opposite outer edge and then paint the middle poles with 'alpha_100' and the outer poles with 'alpha_000'.
Inside Volume It is important that the vertex points (brush corners) are inside of the alpha fade brushes as the diagram to the left shows. If they are not the terrain blends will be broken.

The alpha fade brushes need to be painted on all sides with the same shader, otherwise the compiler will produce unreliable results.

if a 'func_group' entity contains an alpha fade brush, it will only affect the contents of the entity group it belongs to and nothing else.

Do not overlap alpha fade brushes on the same vertex point unless they belong to different 'func_group' entities.
 Alpha Terrain Shaders    
With the alpha fade shaders setup and the new brushwork poles in place on the terrain the final step is to update the terrain shaders to work with the new alpha fade system.

01
02
03
04
05
06
07
08
09
10
11
12
13
14
15
16
17
18
19
20
textures/terblend_soc/tut2_sandmoss { qer_editorimage textures/terblend_soc/ter_sandmoss.tga q3map_tcGen ivector ( 128 0 0 ) ( 0 128 0 ) { map textures/terblend_soc/ter_sand1.tga rgbGen identity } { map textures/terblend_soc/ter_moss2.tga blendFunc GL_SRC_ALPHA GL_ONE_MINUS_SRC_ALPHA alphaGen vertex rgbGen identity } { map $lightmap blendFunc GL_DST_COLOR GL_ZERO rgbGen identity } }

Lines 1-20 Is the new material shader setup with a new structure of primary texture, secondary texture and lightmap stage. All three stages are drawn regardless of alpha blend value.

Lines 11-12 Sets up the correct shader blend mode to use the alpha channel and to take the alpha fade value from the vertex points. This texture is drawn on top of the primary.

21
22
23
24
25
26
27
28
29
30
31
32
33
34
textures/terblend_soc/tut2_moss2 { qer_editorimage textures/terblend_soc/ivec_moss2.tga q3map_tcGen ivector ( 128 0 0 ) ( 0 128 0 ) { map textures/terblend_soc/ter_moss2.tga rgbGen identity } { map $lightmap blendFunc GL_DST_COLOR GL_ZERO rgbGen identity } }

Line 24 The terrain textures are 512 x 512 in size and should use a setting of 256 instead of 128 for the 'q3map_tcGen ivector' command. The lower value makes the textures appear to be double density (0.25 scale in the editor) so they look better for screenshots.

Prev Page Next Page
Mememe
Articles 
Level Design -
GameDev Advice -
Creating Terrain -
Terrain Blending -
Rockwall Corridors -
Rockwall Detail -
2 Point Clipping -
Phong Shading -
3D Puzzle Scripting -
Triggerable Shaders -
RTCW Scripting -
Scripted Doors -
Basic Lift -
Advanced Lift -
Cooking -
Apple Crumble -
This site has been cobbled together by Simon O'Callaghan
Contact Information: Simon O'Callaghan
All content is Copyright © 2000-2024
Hosted by ApisNetwork