News Design Artwork Photos Articles
Creative Commons All use of my digital work is covered by this Creative Commons Deed.
Please do not use any of my work for commercial purposes, thank you.
 Terrain Blending (3 of 6) Previous Page Next Page
Basic Blend The terrain is blending sand on the left side to grass on the right. The blending is happening only on the left side of the terrain because only one material shader is setup to use the alpha fade system at the moment.

The next step is to change the blending to be bigger so that the material transition is much more gradual. Instead of just shifting the blend edge over to the middle, it would look better if there were a second blend.

By joining together two alpha fade blends, a third material can be put in the middle to make the blending more interesting. A good filler for sand to grass would be loose gravel.
Click on the above image for a larger version
 Gravel in the middle    
Two Blends To the left is an image that shows what the terrain looks like in the editor with the new material shaders. The alpha fade brushes are placed down the middle and on either side of the terrain to create the blends.

Below are the new material shaders setup with a similar structure of primary, secondary and lightmap. The primary textures are supposed to be on either side of the terrain while the secondary is in the middle.

The secondary texture is setup with no custom alpha channel to make sure the two blends match together at the seam. This will also allow the secondary texture to hide the primary texture swap over underneath.
01
02
03
04
05
06
07
08
09
10
11
12
13
14
15
16
17
18
19
20
textures/terblend_soc/tut3_sandgravel { qer_editorimage textures/terblend_soc/ter_sandgravel.tga q3map_tcGen ivector ( 128 0 0 ) ( 0 128 0 ) { map textures/terblend_soc/ter_sand1.tga rgbGen identity } { map textures/terblend_soc/ter_gravel1_noalpha.tga blendFunc GL_SRC_ALPHA GL_ONE_MINUS_SRC_ALPHA alphaGen vertex rgbGen identity } { map $lightmap blendFunc GL_DST_COLOR GL_ZERO rgbGen identity } }

Lines 11-12 
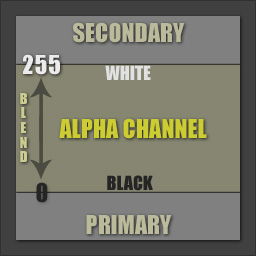
Sets up the correct shader blend mode to use the alpha channel and to take the alpha fade value from the vertex points. This texture is drawn on top of the primary.

21
22
23
24
25
26
27
28
29
30
31
32
33
34
35
36
37
38
39
40
textures/terblend_soc/tut3_mossgravel { qer_editorimage textures/terblend_soc/ter_mossgravel.tga q3map_tcGen ivector ( 128 0 0 ) ( 0 128 0 ) { map textures/terblend_soc/ter_moss2.tga rgbGen identity } { map textures/terblend_soc/ter_gravel1_noalpha.tga blendFunc GL_SRC_ALPHA GL_ONE_MINUS_SRC_ALPHA alphaGen vertex rgbGen identity } { map $lightmap blendFunc GL_DST_COLOR GL_ZERO rgbGen identity } }

Lines 4 & 24 
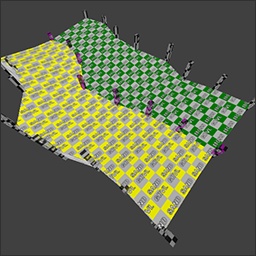
The terrain textures are 512 x 512 in size and should use a setting of 256 instead of 128 for the 'q3map_tcGen ivector' command. The lower value makes the textures appear to be double density (0.25 scale in the editor) so they look better for screenshots.

 Gravel Sandwich    
Gravel Sandwich The terrain is starting with a solid primary (sand) texture which is then blended to a solid secondary (gravel) texture and finally blended back to another primary (grass) texture.

The problem with this terrain is that the material divisions are too obvious.

One way to fix this could be to create a special blend texture with half sand and gravel, but the point of the blending system is to create blends and not use special textures.

The best solution is to create an unique alpha channel for the gravel material so that the middle is a blend of all three textures.
Click on the above image for a larger version
 Alpha Channel Blending    
Alpha Channel The Alpha Channel is a greyscale texture with a black value (0) showing 100% of the primary texture and white value (255) showing 100% of the secondary texture.

This is a variable type of blend because the alpha value can be different across the whole surface of the secondary texture. This really works well with 'hard' edge material types like pebbles and rocks.

The Q3 shader system does support several hard edge blend modes (LT128, GT0 and GE128) which can be used to make the alpha channel detail very sharp for solid material objects like large rocks.
 Creating an Alpha Channel    
Gravel Sandwich The alpha channel should be based on how the material grows and reacts to other materials around it. For example dirt would blend around stones and pebbles and not across them while mud would form sharp cracks to show depth.

To create a quick alpha channel, take the texture and convert it to greyscale. Increase the brightness by 100% so the image is shades of white and grey. If requiring hard edges then increase the contrast value.

In Photoshop click on the new channel button, (highlighted in red on the left) paste the greyscale alpha image into the channel and save as a 32bit TGA file.
Prev Page Next Page
Mememe
Articles 
Level Design -
GameDev Advice -
Creating Terrain -
Terrain Blending -
Rockwall Corridors -
Rockwall Detail -
2 Point Clipping -
Phong Shading -
3D Puzzle Scripting -
Triggerable Shaders -
RTCW Scripting -
Scripted Doors -
Basic Lift -
Advanced Lift -
Cooking -
Apple Crumble -
This site has been cobbled together by Simon O'Callaghan
Contact Information: Simon O'Callaghan
All content is Copyright © 2000-2024
Hosted by ApisNetwork