|
|

|
|
All use of my digital work is covered by this
Creative Commons Deed.
Please do not use any of my work for commercial purposes, thank you. |
|
|
|
|
2 Point Clipping (4 of 4)
|

|
|

|
|
|
|
|
 |
|
|
|
 |
|
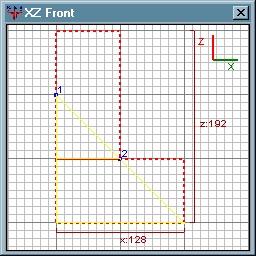
It is often quicker to cut multiple brushes with the same cutting
angle than it is to slice each brush one at a time. You
can add or remove brushes to the selection while the clipper
tool is active.
To add more brushes to the clipper tool selection move the cursor
to either the 2D or 3D window. Press and hold down the "SHIFT"
key and then press the Left Mouse Button (LMB) once while over the
bottom brush. In the 3D window the bottom brush will disappear
because the cutting side is pointing down. (Remember the
Thumb/Index rule described above)
Move the second marker (blue dot) to the new location as specified
in the diagram to the side. As you move the marker (blue dot) the
cutting angle should change and the second brush will come back
into view again in the 3D window.
|
|
|
|
|
 |
|
|
|
|
|
|
|
|
|
|
 |
|
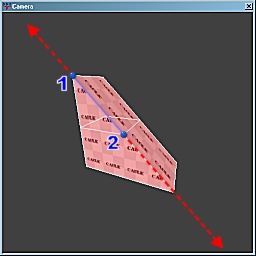
As the diagram to the side shows the clipper tool markers
(blue dots) do not encompass all of the selected brushes
but yet the second brush is still affected.
The cutting angle of the clipper tool will always extend beyond
the markers (blue dots) in both directions. This is why both
brushes are affected by the clipper tools' cutting angle.
To remove a brush, move the cursor to either the 2D or 3D window.
Press and hold down the "SHIFT" key and then press the Left Mouse
Button (LMB) once while over the brush to remove.
Once a brush has been removed from the clipper tool selection,
it will be restored back to its original size and shape. Brushes
can always be removed from the clipper tool selection even if
they are hidden from view by the cutting side.
|
|
|
|
|
|
|
|
|
|
Expanding/Shrinking Brushes
|
|
|
|
|
|
|
|
|
|
|
|
 |
|
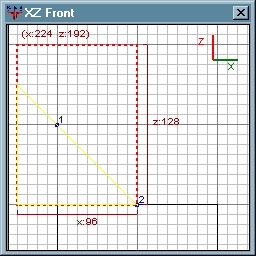
While the clipper tool is active, any of the selected brushes
can be moved around or re-sized. This allows for fine tuning
of the selected brushes before the clipper tool's cut is
applied.
To re-size the shape of the brush, first move the mouse cursor
to the outside edge. (The cursor should not be on the
inside of the dotted lines)
Press and hold the Left Mouse Button (LMB) and gently drag
the mouse either away from or towards the center of the brush.
When finished, release the LMB.
If you make any mistakes while moving or re-sizing the
selected brushes, simply press "CTRL+Z" to undo the last
step.
|
|
|
|
|
|
|
|
|
|
|
|
|
|
|
|
 |
|
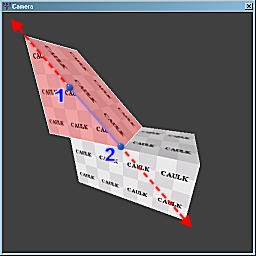
As the diagram to the side shows, when the top brush
is extended left, the cutting angle is also applied to the
new expanded area.
The cutting angle of the clipper tool will always extend beyond
the markers (blue dots) in both directions. This is why the
expanded section of the top brush is affected like this.
All movement/re-sizing of brushwork is based on the original
size/shape of the brush. This is because the clipper tool
cut has not been commited to the brushwork yet.
|
|
|
|
|
|
|
|
|
|
|
|
|
|
|
|
 |
|
Once you are happy with the cutting ...
Angle - marker locations (blue dots)
Direction - 2D window view (Front, Side, Top)
Side - Thumb/Index finger rule
... press the "ENTER" key and the clipper tool will commit the
changes to the selected brushwork.
If you are not happy with any of the clipper tool changes, simply
press "CTRL+Z" and the brushwork will revert back to how it
was before the cut.
|
|
|
|
|
|
|
|
|
|