|
|

|
|
All use of my digital work is covered by this
Creative Commons Deed.
Please do not use any of my work for commercial purposes, thank you. |
|
|
|
|
Rock Wall Detail (2 of 4)
|

|
|

|
|
|
|
|
 |
|
|
|
 |
|
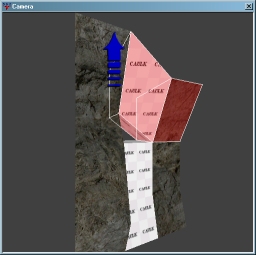
A quick way to start the transition template is to use the old template as a base first.
Take a copy of the old template and move the new brushes to the left as the image to
the side shows.
In this example the top segment is identical to both the old and new templates and the
new brush should fit the gap perfectly.
Select the top segment brush and shear it upwards on the left hand side like the blue
arrow in the image to the side shows.
|
|
|
|
|
 |
|
|
|
|
|
|
|
|
|
|
 |
|
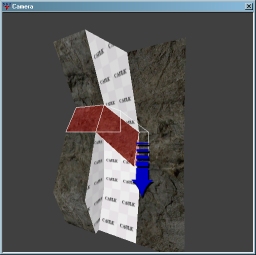
The transition template involves one extra segment which will have to be made from a triangular
brush. (Two points on the right and one point on the left)
Take a copy of the extra segment in the new template and move it to right.
Shear the edge closest to the old template downwards like the blue arrow
in the image to the side shows.
At this point I would recommend keeping the new segment as an uncut brush. Its far easier
to twist an square brush into shape than a triangular one. Plus its handy to store all
templates as axially aligned square brushes for any changes later on.
|
|
|
|
|
|
|
|
|
|
|
|
|
|
|
|
 |
|
The final two brushes at the bottom of the transition template cannot be made from simple square
shapes and sheared into position. They will have to be made from two pairs of square brushes and
then cut into triangular versions later on to fill the gap.
As recommended earlier it is best to keep the templates as axially aligned brushes ( even with
overlapping edges ) so that any last minute changes can be easily made for previously created
wall sections.
The new segment of the transition template can be quickly made from both the
old and new templates on either side. As suggested at the top of this page, the old template
was duplicated as a starting point.
|
|
|
 |
|
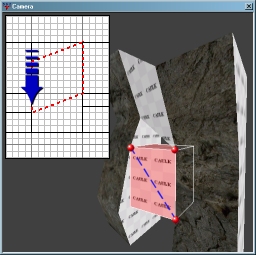
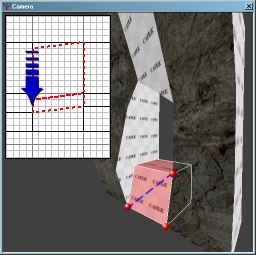
Take the old template copied brush and shear it into position so that it looks like the
top image to the side. The new segment will be eventually cut along the blue line and the red dots
must be aligned with the brushwork either side.
Once the above brush is in place it will be easier to see what is going on by hiding the brush from view.
Use the 'H' key while the brush is selected and it will not be drawn until you show the brush again.
( Use SHIFT+H to show all previously hidden brushwork )
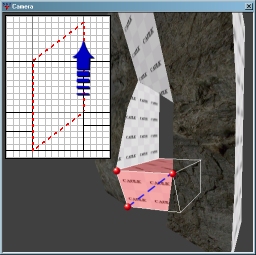
Take a copy of the new template brush and duplicate it to the right. Shear the segment into position
so that the red dots are lined up with the brushwork either side like the image to the side.
|
|
|
|
|
|
|
|
|
|
|
|
|
|
|
|
 |
|
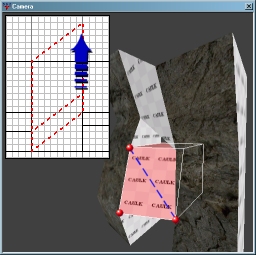
The last segment of the transition template can be quickly made from both the
old and new templates on either side. As suggested at the top of this page, the old template
was duplicated as a starting point.
Take the old template copied brush and shear it into position so that it looks like the
image to the side. The new segment will be eventually cut along the blue line and the red dots
must be aligned with the brushwork either side.
Once the brush is in place it will be easier to see what is going on by hiding the brush from view.
Use the 'H' key while the brush is selected and it will not be drawn until you show the brush again.
|
|
|
 |
|
Take a copy of the new template brush and duplicate it to the right.
Shear the segment into position so that the red dots are lined up with the brushwork either side
like the image to the side.
If during any of the above stages you have hidden brushwork with the 'H' key (hidden function) then
use the SHIFT+H keys now to show all previously hidden brushwork.
In the above 4 images are inserts showing the brushwork segment in the 2d window. The blue arrow in each
diagram shows the recommended direction to shear the brushwork in order to complete this example.
|
|
|
|
|
|
|
|
|
|