|
|

|
|
All use of my digital work is covered by this
Creative Commons Deed.
Please do not use any of my work for commercial purposes, thank you. |
|
|
|
|
Rock Wall Templates (2 of 4)
|

|
|

|
|
|
|
|
 |
|
|
|
 |
|
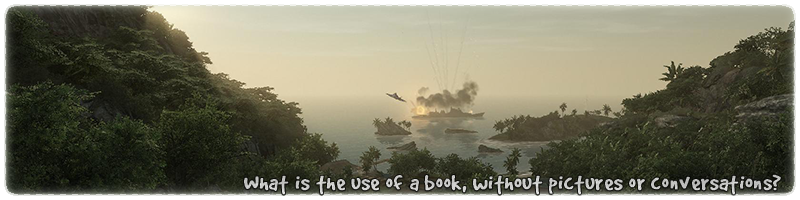
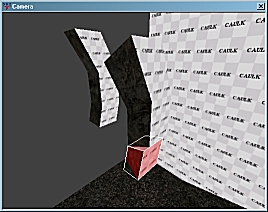
De-select all other brushwork in the map. Then select
the lowest brush of the new wall section. Make sure
the 2D window is facing the front of the brushwork.
Move the cursor to where the arrow is in the diagram. Press
and hold the "CTRL" key on the keyboard. On the mouse, press
and hold the left mouse button (LMB). With both the "CTRL" key and
the LMB pressed at the same time gently move the cursor upwards
with the mouse.
As you move the mouse cursor upwards the brush will change shape
and distort. In this example the brushwork is moved up by 16
map units.
The degree by which the brushwork is moved up or down is totally
up to you and it all depends on how jagged you want the rock
face to look.
|
|
|
|
|
 |
|
|
|
|
|
|
|
|
|
|
 |
|
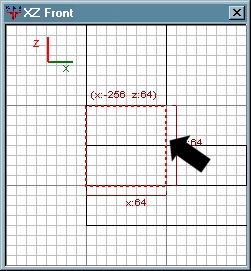
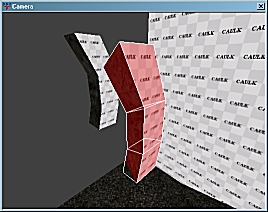
Once the distortion is complete it should look like the
diagram to the side.
If any of the brushwork twists into a strange shape you can press
"CTRL+Z" to undo the operation and try again.
This method of distorting the brushwork is often/usually referred
to as shearing or edge manipulation. The main advantage to
this method is that the brushwork maintains its square shape
and its faces are not broken down into triangles.
This method rarely produces brushwork errors and
is extremely quick to do.
|
|
|
|
|
|
|
|
|
|
|
|
|
|
|
|
 |
|
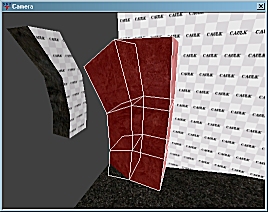
Select each of the other brushes and repeat the above
steps to create the same style of distortion. All of the brushes
should be distorted by the same amount and in the same direction.
Once all of the brushes have been distorted by the above
method they should look like the diagram to the side.
|
|
|
|
|
|
|
|
|
|
|
|
|
|
|
|
 |
|
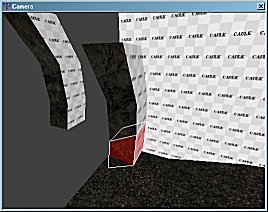
At this point the brushwork is only being varied in one
direction. In order to create something a bit more believable
the brushwork needs to be moved in two directions. (two axes)
De-select all other brushwork in the map. Then select
the lowest brush of the new wall section. Make sure
the 2D window is looking top down onto the brushwork.
Move the cursor to where the arrow is in the diagram. Press
and hold the "CTRL" key on the keyboard. On the mouse, press
and hold the left mouse button (LMB). With both the "CTRL" key and
the LMB pressed at the same time gently move the cursor downwards
with the mouse.
As you move the mouse cursor downwards the brush will change shape
and distort. In this example the brushwork is moved down by 16
map units.
|
|
|
|
|
|
|
|
|
|
|
|
|
|
|
|
 |
|
Once the distortion is complete it should look like the
diagram to the side.
This method has twisted the brush safely and cleanly in
several axes without going anywhere near vertex editing.
The beauty of this method is that brushwork can be distorted
as many times as you want or have time for. As long as the
distortion is repeated across the whole template it should
not produce any brushwork cracks.
|
|
|
|
|
|
|
|
|
|
|
|
|
|
|
|
 |
|
Select each of the other brushes and repeat the above
steps to create the same style of distortion. All of the brushes
should be distorted by the same amount and in the same direction.
Once all of the brushes have been distorted by the above
method they should look like the diagram to the side.
|
|
|
|
|
|
|
|
|
|
|
|
|
|
|
|
 |
|
Take the template brushwork and create another copy as before.
Move the new brushwork into place next to the distorted
brushwork. Make sure it lines up correctly so there are
no gaps between the two sections.
Start distorting the new section of brushwork as instructed
above. Each time you distort the brushwork try to get the
degree of distortion different and unique.
Do not be tempted to copy and paste previous versions because
the rock wall is suppose to look natural and random. Remember it does
not take much time to create the distortion in the first place, so
keep it unique.
|
|
|
|
|
|
|
|
|
|
Here is something I prepared earlier ...
|
|
|
|
|
|
|
|
|
|
|
|
 |
|
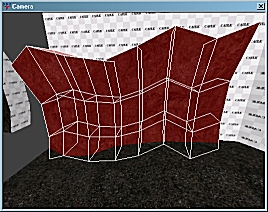
Once you get into the routine of distorting the brushwork
it should be fairly easy to create a small wall section as the
diagram to the side shows.
By varying the brushwork in two directions it can produce
a very quick and simple low poly rock face.
Don't be afraid to push the distorted brushwork into the floor
area. At the very end of the exercise you can clip all of the
brushes so they are flush with the floor.
|
|
|
|
|
|
|
|
|
|