|
|

|
|
All use of my digital work is covered by this
Creative Commons Deed.
Please do not use any of my work for commercial purposes, thank you. |
|
|
|
|
Rock Wall Templates (3 of 4)
|

|
|

|
|
|
|
|
 |
|
|
|
 |
|
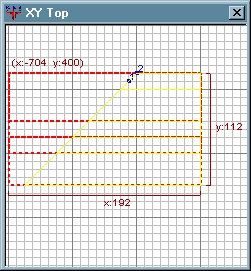
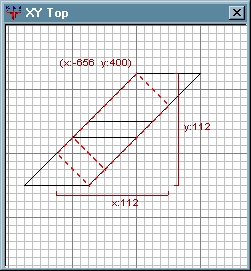
At some point you are going to need to turn a corner and
create distorted brushed at even more bizarre angles.
To do this you will need at least one corner template.
In this example we are going to create a 45 degree
template for turning corners.
Take the existing template and copy it. Extend the new
brushwork so that it is three times wider than before.
See diagram to side for an example.
Remember to keep all of the template brushwork selected
for the next step of the process.
|
|
|
|
|
 |
|
|
|
|
2 Point Clipping (First cut)
|
|
|
|
|
|
|
|
|
|
|
|
 |
|
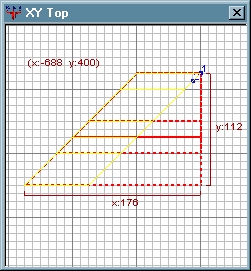
A quick way to create a 45 degree template is to cut the existing
template on both sides. Make sure the 2D window is looking down
on the brushwork.
As the diagram to side shows use the clipper tool to
place two cutting points. (The numbered blue dots in the diagram)
To use the clipper tool, press and hold the "CTRL" key on the
keyboard and then press ONCE the right mouse button (RMB). This
will add a numbered blue dot to the 2D window.
Repeat the above steps to add the second point which will form
a line across the brush. (Imagine a knife edge)
If you need to move the cutting points around, press the "CTRL" key
and move the cursor over the blue dot. The cursor will change
from an arrow to a cross. Press and hold the LMB
and then move the cutting point to where you want them.
|
|
|
|
|
|
|
|
|
|
2 Point Clipping (Second cut)
|
|
|
|
|
|
|
|
|
|
|
|
 |
|
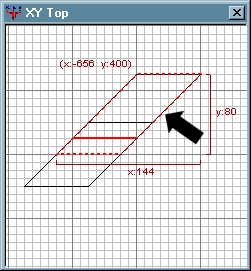
To actually cut the brushwork with the clipper tool press the
"ENTER" key after both clipping points (blue dots) have been applied
to the brushwork.
Repeat the same clipper tool process for the opposite side
of the brushwork template. As the diagram to the side shows,
reverse the order of the clipping points so that the middle
part of the brushwork is yellow.
Remember the yellow part of the brushwork is the section
which will remain after the clipper tool has been applied.
|
|
|
|
|
|
|
|
|
|
|
|
|
|
|
|
 |
|
De-select all the brushwork in the map. Then select
one of the template brushes. Trying to distort multiple
brushes at the same time can produce strange results.
Move the cursor to where the arrow is in the diagram. Press
and hold the "CTRL" key on the keyboard. On the mouse, press
and hold the left mouse button (LMB). With both the "CTRL" key and
the LMB pressed at the same time gently move the cursor downwards
with the mouse.
As you move the mouse cursor downwards the brush will change shape
and distort. In this example the brushwork is moved down until
the angle of the brushwork is in a square shape. (45 degree angle)
TIP: If you watch the brush as you are move it, you will have a
45 degree angle when the lines of the brush align diagonally to the grid from
corner to corner.
|
|
|
|
|
|
|
|
|
|
|
|
|
|
|
|
 |
|
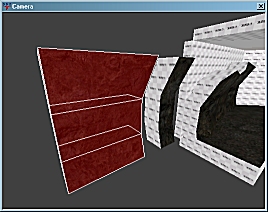
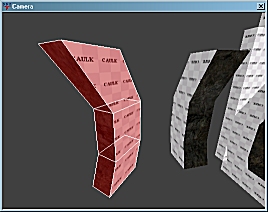
Once the distortion is complete it should look like the
diagram to the side.
This distortion has produced a nice clean version of the original
brushwork template but at a nice 45 degree angle.
This brushwork could have been created with the
3D clipping tool, but maybe not as easily.
This method is no substitute for the 3D clipping tool
but simply an alternative.
|
|
|
|
|
|
|
|
|
|
Final 45 Degree Distortion
|
|
|
|
|
|
|
|
|
|
|
|
 |
|
Select each of the other brushes in the new template and
repeat the above steps to create the same style of distortion.
All of the template brushes should be distorted by the same
amount and in the same direction.
Once all of the brushes have been distorted by the above
method they should look like the diagram to the side.
|
|
|
|
|
|
|
|
|
|