|
|

|
|
All use of my digital work is covered by this
Creative Commons Deed.
Please do not use any of my work for commercial purposes, thank you. |
|
|
|
|
Rock Wall Templates (4 of 4)
|

|
|

|
|
|
|
|
 |
|
|
|
 |
|
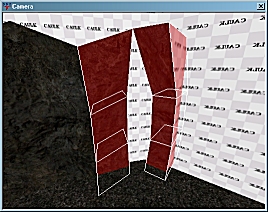
Take the new 45 degree wall template and make a copy it. Move the
new template to the corner section of the tunnel.
Make sure the 45 degree template is lined up with the
existing wall. In this example, line up the
top brushes because they poke out the furthest from the
other brushwork.
Do not do any brushwork distortion on the 45 degree
template. It will be a nightmare to line up with the straight
wall section otherwise.
You can create distorted corner sections if you wish,
but they require alot of patience to be lined up correctly.
|
|
|
|
|
 |
|
|
|
|
|
|
|
|
|
|
 |
|
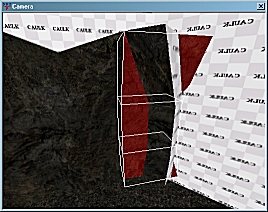
Select the standard wall template and copy it. Move the
new template so that it is next to the existing straight
wall section as in the diagram to the side.
Do not do any brushwork distortion on the wall template.
It will be a nightmare to line up with the 45
degree section otherwise.
You can create distorted corner sections if you wish,
but they require alot of patience to be lined up correctly.
|
|
|
|
|
|
|
|
|
|
|
|
|
|
|
|
 |
|
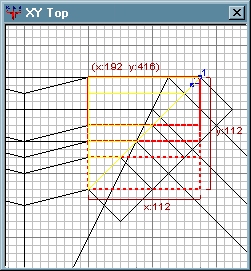
As the diagram to side shows use the clipper tool to
place two cutting points. (The numbered blue dots in the diagram)
To use the clipper tool, press and hold the "CTRL" key on the
keyboard and then press ONCE the right mouse button (RMB). This
will add a numbered blue dot to the 2D window.
Repeat the above steps to add the second point which will form
a line across the brush. (Imagine a knife edge)
If you need to move the cutting points around, press the "CTRL" key
and move the cursor over the blue dot. The cursor will change
from an arrow to a cross. Press and hold the LMB
and then move the cutting point to where you want them.
|
|
|
|
|
|
|
|
|
|
|
|
|
|
|
|
 |
|
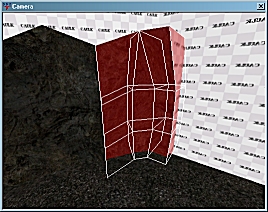
To actually cut the brushwork with the clipper tool press the
"ENTER" key after both clipping points (blue dots) have been applied
to the brushwork.
Remember the yellow part of the brushwork is the section
which will remain after the clipper tool has been applied.
Once the cut has been done the corner brushwork should
look like the diagram to the side.
|
|
|
|
|
|
|
|
|
|
|
|
|
|
|
|
 |
|
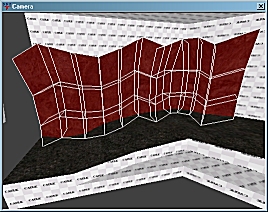
Once the corner section is in place, the new 45 degree sections
can be used exactly like the straight sections. The tunnel
wall can carry on and if necessary around more corners.
Because the 45 degree sections are already distorted, you may
need to "CTRL" drag the edges in the 3D window. This distortion
method is not limited to the 2D window and often because
of the complex nature of the brushwork it is often easier to
use the 3D window.
Finally when you are finished with the brushwork, remember
to clip off the excessive brushwork faces which go into the
floor of the tunnel.
|
|
|
|
|
|
|
|
|
|